
Outdoor Faucet Freeze Protection for Chicago Homeowners in West Elsdon and Nearby Areas
Freeze-thaw cycles in West Elsdon winters create a specific and costly problem for homeowners. Your outdoor spigot bursts when expanding ice ruptures the copper or PEX line inside your wall, and water floods your basement before you notice the damage. This preventable disaster costs homeowners $3,000 to $15,000 in restoration, structural drying, and mold remediation. The fix takes less than an hour and costs under $50 compared to the damage bill.
A burst outdoor spigot announces itself with pooling water in your basement or water pouring down the foundation wall. By then, the pressure from expanding ice has already split the line. Water flows freely into your home for hours or days.
Working in West Elsdon and Garfield Ridge for the past 15 years, I have seen this pattern repeat every winter. Homes built before 2000 in these neighborhoods lack proper insulation and frost-proof design on their outdoor plumbing. The good news is that winterization works. The bad news is that most homeowners wait until December when the first polar vortex arrives.
This guide walks you through everything you need to protect your outdoor faucets before the deep freeze hits.
Why West Elsdon and Garfield Ridge Winters Damage Outdoor Plumbing So Severely
These neighborhoods experience intense freeze-thaw cycles. Temperatures drop, stay cold, then warm up, then drop 20 degrees overnight. This cycle is the enemy of outdoor plumbing.
Water expands approximately 9 percent when it freezes. Inside a rigid copper pipe, that expansion creates pressure that exceeds the pipe’s tensile strength. Most copper plumbing can withstand around 2,000 PSI before it ruptures. A frozen water line generates enough force to split the pipe along its length.
Wind chill makes things worse. When temperatures drop to minus 20 degrees Fahrenheit with wind gusts pushing 25 miles per hour, the exterior walls of your home lose heat faster than the interior can replace it. The uninsulated section of pipe just inside the rim joist freezes first, blocking water flow. Pressure builds. The pipe fails.
The Chicago Building Code requires that hose bibbs be installed at least 6 inches below the frost line for the region. In this area, that frost line sits roughly 42 inches below grade. Most homes built in the 1950s through 1980s, which make up a large portion of West Elsdon and Garfield Ridge housing stock, have outdoor faucets installed at or above this depth. They freeze reliably every winter.
Understanding Your Outdoor Faucet Type
Not all outdoor faucets are created equal. The type you have determines your winterization approach.
A standard hose bibb is the most common type in older West Elsdon and Garfield Ridge homes. Water fills the entire valve chamber. When the temperature drops, water inside freezes and expands, splitting the valve or the pipe connection. These freeze without fail in a real winter here.
A frost-proof sillcock, also called a frost-proof hose bibb, is engineered to prevent freezing. The valve sits about 12 inches inside the wall, where temperatures stay above freezing. When you turn off the handle, a spring-loaded stem recedes, draining all water from the external spout. The spout itself has a small drain hole, so no water remains to freeze. If you own a home built after 1995, you likely have one of these. If you own a classic Chicago bungalow or a workers cottage built before 1970, you almost certainly have a standard bibb that freezes.
This difference is critical. A frost-proof sillcock still needs insulation, but it is far less prone to failure than a standard bibb.
Step-by-Step Winterization Process for West Elsdon and Garfield Ridge Spigots
- Disconnect and Drain the Hose
Before mid-October, when the first cold snap typically arrives, disconnect any garden hoses from your outdoor spigots. Trapping water inside a hose causes it to freeze and transmit pressure back through the faucet, damaging the line. Drain the hose completely. Store it in your garage or basement.
- Locate the Interior Shut-Off Valve
This is the most important step and the one most homeowners skip. Find the water line that feeds your outdoor faucet. It runs from your main water line through the rim joist, the horizontal board that supports your home’s rim, and connects to the spigot. Inside your basement or crawl space, locate the small hand valve on this line. It typically has a lever or a round knob. Turn it clockwise to shut off water to the outdoor faucet. Do not turn the main water shut-off valve. You only want to isolate the exterior line.
- Open the Outdoor Spigot
After shutting the interior valve, go outside and turn the faucet handle fully open. Leave it open during the entire winter. This allows any remaining water in the line to drain out and prevents a vacuum from forming.
- Find and Open the Bleeder Valve
If your home has a bleeder valve, a small brass valve on the supply line just before it exits the house, turn it counterclockwise to open it. This tiny valve releases remaining water from the line. Some newer frost-proof systems have bleeder valves built in. Older standard bibbs rarely have them, which is why they fail. If your line lacks a bleeder valve, listen closely to the outdoor faucet. Water should trickle out for a few seconds, then stop. That means the line is dry.
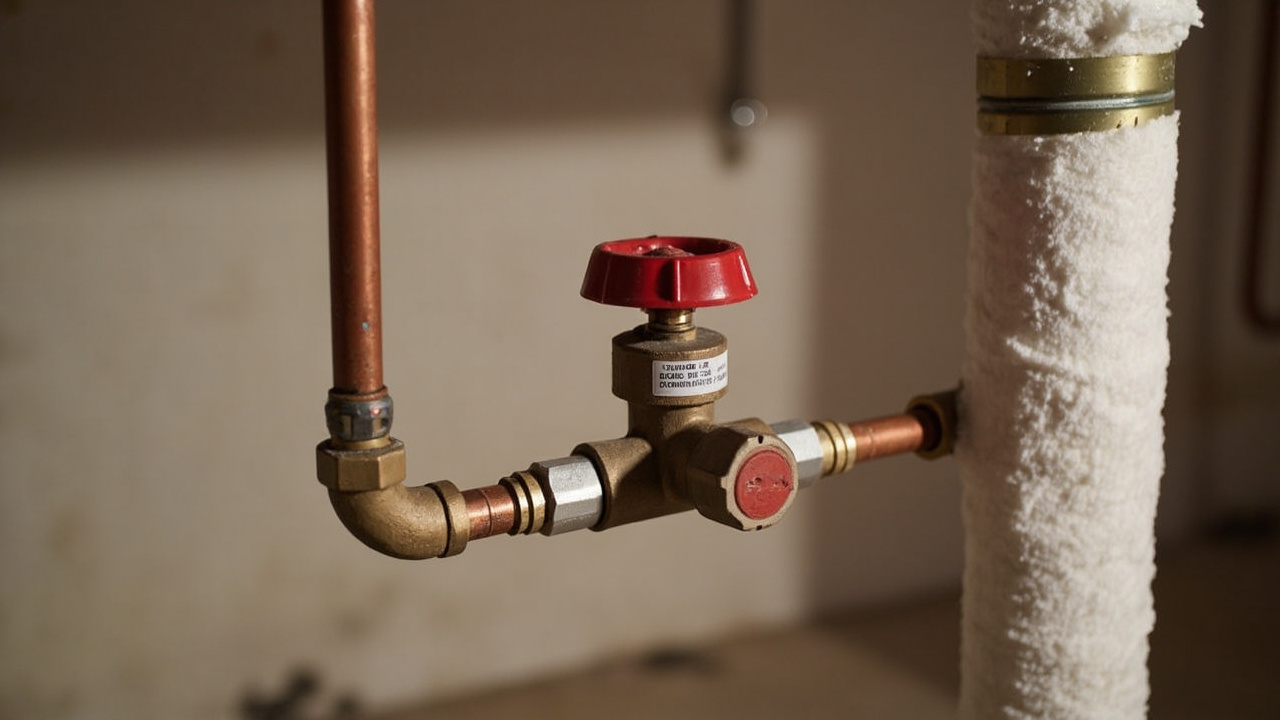
- Insulate the Line Inside the Wall
The most vulnerable section of your outdoor water line is where it passes through the rim joist and exterior wall. This is the coldest point. If your basement or crawl space is accessible, locate this section. Wrap it with self-sticking foam pipe insulation tape, available at any hardware store for under ten dollars. Overlap the tape as you wrap, working from the interior shut-off valve all the way to the exterior wall. The insulation slows heat loss and means the difference between a frozen pipe and a safe one during extreme cold.
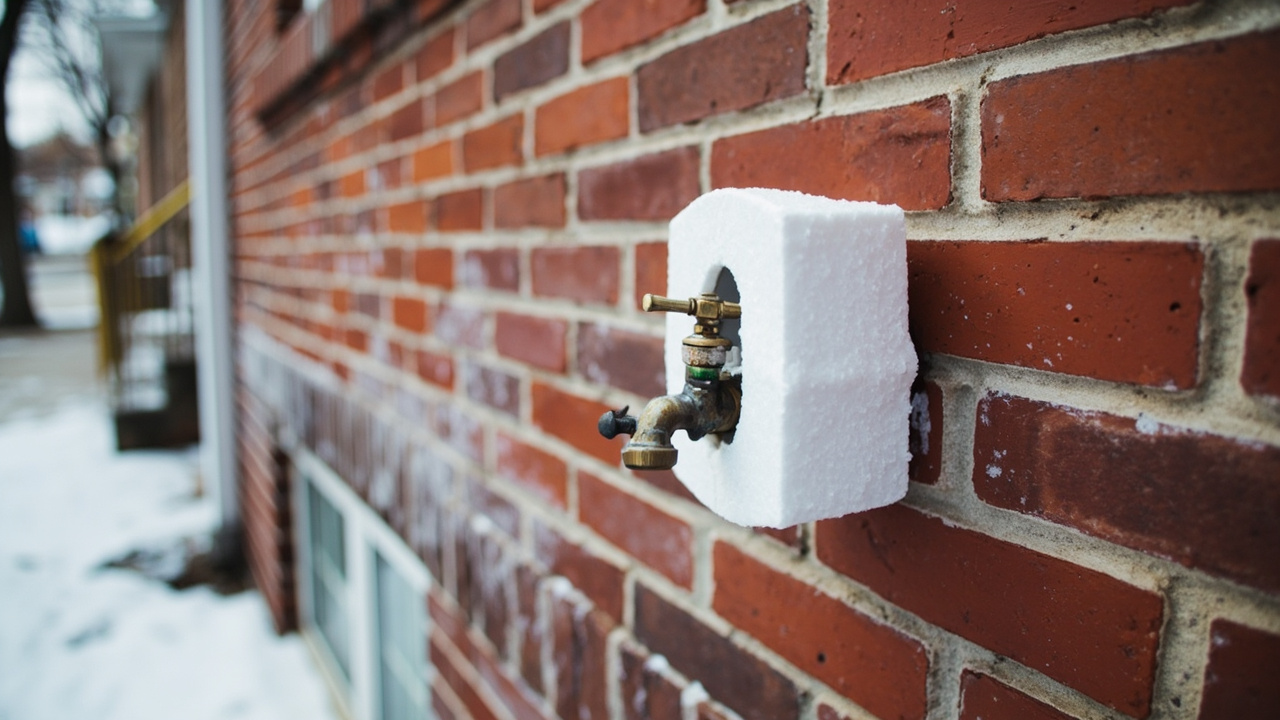
- Install an Outdoor Faucet Cover
Go back outside. Styrofoam faucet covers slide over the spigot and seal with a strap or adhesive backing. They trap residual heat and block wind from pulling warmth away from the valve. Install your cover snugly over the spigot. Make sure the outdoor handle remains in the open position inside the cover.
- Check Your Attic
If the water line for your outdoor faucet runs through an unheated attic instead of an insulated wall, wrap it with heat tape, also called heat cable. This electrical tape warms the pipe and prevents freezing even during extended polar vortex events. Plug the heat tape into a GFCI outlet. It uses minimal power and runs automatically whenever temperatures drop below 40 degrees.
This entire process takes between 45 minutes and an hour per outdoor faucet. Most homes have two spigots. Front-of-house and back-of-house winterization should be completed by October 31, before the first hard freeze arrives.
Comparing Your Protection Options
Different winterization methods offer different levels of protection. Understanding the trade-offs helps you choose the right approach for your home.
| Protection Method | Cost | Effectiveness | Best For | Maintenance |
| Styrofoam Cover Only | Under 10 dollars | Protects to minus 10 degrees | Standard bibbs in insulated walls | Remove in spring. Replace annually |
| Insulated Faucet Sock | 15 to 25 dollars | Protects to minus 20 degrees | Frost-proof sillcocks in exposed locations | Reusable for 3 to 5 seasons |
| Heat Cable with Thermostat | 25 to 50 dollars | Protects to minus 40 degrees | Attic lines and exposed piping | Plug in by October 1st. Unplug by April 1st |
| Interior Line Insulation Plus Cover | 20 to 35 dollars | Protects to minus 30 degrees | Standard bibbs in uninsulated rim joists | Annual inspection. Replace tape if damaged |
| Replace with Frost-Proof Sillcock | 150 to 300 dollars | Protects to minus 40 degrees | Permanent solution for permanent spigots | No winter maintenance needed |
For most West Elsdon and Garfield Ridge homeowners with standard spigots in older bungalows, the combination of interior line insulation plus a Styrofoam cover offers the best balance of cost and reliability. If your spigot sits in an uninsulated exterior wall or you experience multiple freeze events, upgrade to a faucet sock or heat cable.
If you are planning a basement renovation or foundation upgrade, replacing your standard bibb with a frost-proof sillcock eliminates the winterization headache for decades. The one-time cost of 200 to 300 dollars beats the thousand-dollar water damage bill that comes from a burst pipe.
The Hidden Danger Inside Your Rim Joist
Most water damage from frozen outdoor faucets in West Elsdon does not happen at the spigot itself. It happens where the water line passes through the rim joist.
The rim joist is the horizontal board that sits on top of your foundation and supports the first floor of your home. In a typical Chicago bungalow, the rim joist has minimal insulation. The water line running through it gets no protection from the cold air seeping in from the exterior.
When the outdoor faucet is open and drained during winter, water should not sit in this section. The open faucet prevents a pocket of water from trapping in the line and freezing under pressure. But if your interior shut-off valve leaks or if you forget to open the outdoor handle, water remains trapped in the rim joist.
Freezing temperatures convert that trapped water to ice. The expanding ice exerts outward pressure on the copper or PEX line. The line splits along its length. Water flows out of the split into the rim joist and down into your basement.
By the time you notice, 50 to 100 gallons of water may pool in your basement. The rim joist wood absorbs moisture and begins to rot. Mold grows in the damp wood. The structural integrity of your home is compromised.
This is why rim joist insulation matters. Self-sticking foam pipe insulation, combined with a closed interior shut-off valve and an open outdoor spigot, creates three layers of protection. The insulation slows heat loss. The closed valve stops new water from entering. The open spigot prevents pressure buildup.
Detecting Freeze Damage Before It Destroys Your Basement
Sometimes winterization fails. A valve leaks. A power outage prevents a heat cable from running. An unusual cold snap arrives before you finish preparing.
Knowing the signs of freeze damage helps you catch the problem before water pours into your basement.
Check your outdoor spigot weekly from November through March. Turn it on and look for water dripping from the handle or spout. A tiny drip indicates ice is starting to form inside the valve. Turn the handle back to the off position and leave it there. If the drip continues, the valve may have a crack and needs professional attention.
Inspect your basement after each cold snap. Look for new water stains on the foundation wall near the location of your outdoor spigots. A dark discoloration where none existed before signals water leaking down from the rim joist. The smell of wet basement odor, even if your sump pump is working fine, often indicates a slow leak from a frozen pipe.
Check the area where the water line enters your house from the outdoor faucet. If you can access the rim joist, feel the pipe for frost or ice buildup. If the pipe is warm and dry, your winterization is working. If frost covers the exterior, heat is escaping faster than expected. Add extra insulation or use heat tape.
If you spot a small pool of water in your basement and suspect a burst outdoor line, do not ignore it. This is the moment to call for professional assessment. A burst line that freezes again overnight may ice over temporarily, stopping the leak. Then when the temperature rises above freezing for a few hours, the ice melts and water floods your basement again. In February and March, when weather swings from minus 5 to plus 40 degrees in the same week, this cycle repeats multiple times.
What to Do If Your Outdoor Faucet Is Already Frozen
If you discover your spigot will not turn on or water drips from it constantly, the line is likely partially or completely frozen.
Step one is to close the interior shut-off valve immediately. Go to your basement and turn the small hand valve clockwise. This stops new water from reaching the frozen section.
Step two is to leave the outdoor spigot in the open position. This allows any melting water to drain freely instead of creating pressure inside the frozen line.
Do not use a blowtorch or propane heater to thaw the frozen section. Open flames near your home’s exterior create fire hazard and can damage siding or nearby materials. Do not pour boiling water directly onto the frozen section either. The thermal shock can crack the pipe further.
Instead, wrap the frozen section with heating pads or place a heat lamp a safe distance away. This slow, gentle heat allows ice to melt gradually without creating steam or thermal stress. If the frozen section is inside your wall, you cannot access it directly. In this case, the only safe option is professional help.
Contact a licensed plumber or water damage restoration company immediately if you suspect a burst line inside your wall. A water damage restoration professional can assess whether water is leaking into your walls and help you file an insurance claim for the damage.
When to Call a Professional
You can manage basic winterization on your own. But certain situations require professional plumbing expertise.
If you cannot locate the interior shut-off valve for your outdoor spigot, a plumber can trace the line and identify it. Some older homes in West Elsdon and Garfield Ridge have confusing plumbing layouts, and tracing a line through walls takes experience.
If your home lacks frost-proof sillcocks and you want to upgrade, a plumber can install new ones correctly. This is not a task for a homeowner without plumbing experience. A bad installation that allows water to pool inside the wall causes damage faster than the original unprotected bibb.
If your basement shows signs of water damage and you suspect a frozen outdoor line burst inside the wall, a restoration professional can document the damage, manage moisture removal, and help coordinate with your insurance company. Water from a burst pipe often travels further into your home than you realize. Proper drying prevents hidden mold growth in walls and foundation.
Winterization Timeline for West Elsdon Winters
Timing matters. Starting winterization too late means you are scrambling when the first polar vortex arrives. Starting too early wastes effort and leaves your spigot unnecessarily shut off all winter.
| Month | Action | Temperature Benchmark |
| September | Inspect all outdoor faucets. Gather supplies | Highs still 70s. No urgency yet |
| October 1-15 | Disconnect hoses. Test interior shut-off valves | Nights dropping to 40s. First freeze possible after Oct 15 |
| October 16-31 | Complete winterization. Install covers by Oct 31 | First hard freeze typically occurs Oct 31 to Nov 15 |
| November through March | Weekly inspection. Monitor after cold snaps | Temperatures swing wildly. Freeze-thaw cycles peak |
| April | Remove covers. Open interior shut-off valves | Consistent temperatures above 50 degrees. No freeze risk |
Most residents in this area experience their first frost between October 31 and November 15. By November 1, your winterization should be complete. Any work done after this date is catching up, not preventing.

Why Your Neighbors’ Homes Stay Dry While Yours Floods
Winter after winter, some homes in West Elsdon suffer burst pipes while others do not. The difference is not luck. It is preparation.
Homes that avoid winter water damage follow a consistent pattern. Their owners winterize outdoor plumbing in October. They shut interior valves. They open outdoor spigots. They install insulation and covers. They inspect weekly from November through March.
Homes that suffer water damage skip one or more of these steps. Maybe they forget about winterization until December. Maybe they close the outdoor spigot instead of leaving it open. Maybe they do not insulate the rim joist. Maybe they assume a 40-year-old bibb will survive another winter without protection.
The logic seems simple enough. But when autumn arrives and the weather is still pleasant, winterization feels premature. By the time the first polar vortex arrives in late October, it is too late for careful preparation.
This is why starting in September matters. You avoid the rush. You ensure every step is done correctly. You catch problems before the first freeze.
Protecting Chicago Bungalows in West Elsdon and Garfield Ridge
West Elsdon and Garfield Ridge are dominated by Chicago bungalows and workers cottages built between 1920 and 1960. These homes share similar plumbing vulnerabilities.
The classic Chicago bungalow has an unfinished basement with concrete floor and foundation. The rim joist is exposed. The outdoor plumbing runs directly through the rim joist with minimal insulation. These homes face high risk for frozen outdoor lines. Winterization is essential every year.
If you own a bungalow in West Elsdon or Garfield Ridge, prioritize the rim joist insulation step. The unfinished basement means you can access this line easily. Wrap it thoroughly with foam tape. Test the interior shut-off valve before winter arrives. Many valves in 80-year-old homes are corroded and will not close fully. If yours will not seal, have it replaced by a plumber before November.
Some homes in these neighborhoods have been renovated with finished basements. A finished basement may hide the water line behind a wall, making it impossible to insulate. In these cases, upgrading to frost-proof sillcocks or using heat tape on the outdoor spigot becomes your best defense.
Cost Comparison of Prevention Versus Repair
The math is straightforward. Winterization costs between 20 and 50 dollars per spigot. A burst outdoor line that floods your basement costs between 3,000 and 15,000 dollars to remediate, depending on the severity.
That calculation assumes you catch the burst quickly. If a line leaks slowly for days or weeks before you notice, water damage spreads into walls, subflooring, and structural framing. Mold remediation adds another 2,000 to 8,000 dollars. Insurance deductibles typically run 500 to 2,500 dollars, meaning the damage must exceed your deductible before insurance pays anything.
For most homeowners, insurance does not cover water damage from freeze-thaw events if they result from lack of maintenance. Insurance companies classify frozen pipes as preventable through proper winterization. If you failed to winterize and a pipe burst as a result, your claim may be denied entirely.
The only scenario where insurance typically covers freeze damage is if the damage resulted from a sudden, unforeseeable event like a prolonged power outage that disabled your heating system, not from failure to winterize.
Spending 40 dollars on winterization supplies eliminates both the financial risk and the stress of dealing with water damage in the middle of winter. It is the most cost-effective investment you can make in your home’s protection.
Frequently Asked Questions
Can I leave my outdoor faucet closed but not drained during winter?
No. Leaving the faucet closed traps water inside the valve and pipe. That water will freeze and create pressure that splits the line. You must drain the line completely and leave the outdoor spigot open. The open spigot prevents pressure from building inside the pipe. An open outdoor spigot that is frozen shut looks like a closed spigot from the outside, but water inside can still drain if a crack develops.
Is a Styrofoam cover enough on its own?
For frost-proof sillcocks in insulated walls, yes. For standard bibbs in uninsulated rim joists, no. A cover alone protects against wind and surface cold, but it does not protect the vulnerable section inside your rim joist. You need both interior line insulation and exterior cover protection to reliably prevent freezing in standard bibb installations.
What if I cannot locate the interior shut-off valve?
Trace the outdoor water line from the spigot backward through your basement or crawl space. Follow the copper or PEX line as it approaches your foundation. The shut-off valve is typically mounted on or near the foundation wall. If you still cannot find it, check with your home inspector’s report from when you purchased the home. Older inspection records sometimes note the location. If all else fails, contact a licensed plumber. One service call to locate and label the shut-off valve costs far less than water damage repair.
Do frost-proof sillcocks ever freeze?
Rarely, but they can under extreme circumstances. A frost-proof sillcock is designed to shed water from the internal chamber when you turn off the handle. In normal winters, this design prevents freezing. During extended polar vortex events with sustained temperatures below minus 20 degrees, a poorly installed frost-proof sillcock with a blocked drain hole can freeze. This is why even frost-proof sillcocks benefit from an insulating cover during the worst winter months.
Should I use heat tape on my outdoor faucet?
Heat tape is most useful for water lines running through unheated attics or outside walls with no internal insulation. Heat tape is not necessary for a standard bibb protected with a cover and interior line insulation. Heat tape does add a layer of insurance during extreme cold events and requires minimal electricity. If you want maximum protection and do not mind the minimal cost, wrap heat tape around the interior line section and set it to activate at 40 degrees Fahrenheit.
Take action now. October is your winterization window. By mid-November, the first polar vortex will arrive, and it will be too late for careful preparation. Inspect your outdoor spigots this week. Identify whether you have standard bibbs or frost-proof sillcocks. Gather your winterization supplies. Complete the process by October 31. Then monitor weekly from November through March. Your basement will thank you, and your insurance company will not need to investigate a frozen pipe claim. If you discover damage or are uncertain about your home’s plumbing setup, contact a local professional who understands this area’s climate and building codes.
{
“@context”: “https://schema.org”,
“@type”: “BlogPosting”,
“headline”: “Outdoor Faucet Freeze Protection for Chicago Homeowners in West Elsdon and Nearby Areas”,
“description”: “Prevent burst outdoor spigots in West Elsdon winters. Step-by-step winterization saves thousands in water damage repair.”,
“wordCount”: 3641,
“datePublished”: “2026-04-18T05:06:00.000Z”,
“dateModified”: “2026-04-18T05:06:00.000Z”,
“inLanguage”: “en-US”,
“mainEntityOfPage”: {
“@type”: “WebPage”,
“@id”: “https://cornerstonewaterdamagerestorationchicago.com”
},
“publisher”: {
“@type”: “LocalBusiness”,
“name”: “Cornerstone Water Damage Restoration Chicago”,
“url”: “https://cornerstonewaterdamagerestorationchicago.com”
},
“author”: {
“@type”: “Organization”,
“name”: “Cornerstone Water Damage Restoration Chicago”,
“url”: “https://cornerstonewaterdamagerestorationchicago.com”
},
“image”: {
“@type”: “ImageObject”,
“url”: “https://cornerstonewaterdamagerestorationchicago.com/wp-content/uploads/2026/03/the-best-way-to-prevent-outdoor-spigot-bursts-duri-1.jpg”
}
}
{
“@context”: “https://schema.org”,
“@type”: “LocalBusiness”,
“name”: “Cornerstone Water Damage Restoration Chicago”,
“url”: “https://cornerstonewaterdamagerestorationchicago.com”,
“address”: {
“@type”: “PostalAddress”,
“addressLocality”: “Chicago”
},
“areaServed”: {
“@type”: “City”,
“name”: “Chicago”
}
}
{
“@context”: “https://schema.org”,
“@type”: “FAQPage”,
“mainEntity”: [
{
“@type”: “Question”,
“name”: “Can I leave my outdoor faucet closed but not drained during winter?”,
“acceptedAnswer”: {
“@type”: “Answer”,
“text”: “No. Leaving the faucet closed traps water inside the valve and pipe. That water will freeze and create pressure that splits the line. You must drain the line completely and leave the outdoor spigot open. The open spigot prevents pressure from building inside the pipe. An open outdoor spigot that is frozen shut looks like a closed spigot from the outside, but water inside can still drain if a crack develops.”
}
},
{
“@type”: “Question”,
“name”: “Is a Styrofoam cover enough on its own?”,
“acceptedAnswer”: {
“@type”: “Answer”,
“text”: “For frost-proof sillcocks in insulated walls, yes. For standard bibbs in uninsulated rim joists, no. A cover alone protects against wind and surface cold, but it does not protect the vulnerable section inside your rim joist. You need both interior line insulation and exterior cover protection to reliably prevent freezing in standard bibb installations.”
}
},
{
“@type”: “Question”,
“name”: “What if I cannot locate the interior shut-off valve?”,
“acceptedAnswer”: {
“@type”: “Answer”,
“text”: “Trace the outdoor water line from the spigot backward through your basement or crawl space. Follow the copper or PEX line as it approaches your foundation. The shut-off valve is typically mounted on or near the foundation wall. If you still cannot find it, check with your home inspector’s report from when you purchased the home. Older inspection records sometimes note the location. If all else fails, contact a licensed plumber. One service call to locate and label the shut-off valve costs far less than water damage repair.”
}
},
{
“@type”: “Question”,
“name”: “Do frost-proof sillcocks ever freeze?”,
“acceptedAnswer”: {
“@type”: “Answer”,
“text”: “Rarely, but they can under extreme circumstances. A frost-proof sillcock is designed to shed water from the internal chamber when you turn off the handle. In normal winters, this design prevents freezing. During extended polar vortex events with sustained temperatures below minus 20 degrees, a poorly installed frost-proof sillcock with a blocked drain hole can freeze. This is why even frost-proof sillcocks benefit from an insulating cover during the worst winter months.”
}
},
{
“@type”: “Question”,
“name”: “Should I use heat tape on my outdoor faucet?”,
“acceptedAnswer”: {
“@type”: “Answer”,
“text”: “Heat tape is most useful for water lines running through unheated attics or outside walls with no internal insulation. Heat tape is not necessary for a standard bibb protected with a cover and interior line insulation. Heat tape does add a layer of insurance during extreme cold events and requires minimal electricity. If you want maximum protection and do not mind the minimal cost, wrap heat tape around the interior line section and set it to activate at 40 degrees Fahrenheit.”
}
}
]
}
{
“@context”: “https://schema.org”,
“@type”: “HowTo”,
“name”: “How to Winterize Your Outdoor Faucets”,
“step”: [
{
“@type”: “HowToStep”,
“position”: 1,
“name”: “Disconnect and Drain the Hose”,
“text”: “Before mid-October, when the first cold snap typically arrives, disconnect any garden hoses from your outdoor spigots. Trapping water inside a hose causes it to freeze and transmit pressure back through the faucet, damaging the line. Drain the hose completely. Store it in your garage or basement.”
},
{
“@type”: “HowToStep”,
“position”: 2,
“name”: “Locate the Interior Shut-Off Valve”,
“text”: “This is the most important step and the one most homeowners skip. Find the water line that feeds your outdoor faucet. It runs from your main water line through the rim joist, the horizontal board that supports your home’s rim, and connects to the spigot. Inside your basement or crawl space, locate the small hand valve on this line. It typically has a lever or a round knob. Turn it clockwise to shut off water to the outdoor faucet. Do not turn the main water shut-off valve. You only want to isolate the exterior line.”
},
{
“@type”: “HowToStep”,
“position”: 3,
“name”: “Open the Outdoor Spigot”,
“text”: “After shutting the interior valve, go outside and turn the faucet handle fully open. Leave it open during the entire winter. This allows any remaining water in the line to drain out and prevents a vacuum from forming.”
},
{
“@type”: “HowToStep”,
“position”: 4,
“name”: “Find and Open the Bleeder Valve”,
“text”: “If your home has a bleeder valve, a small brass valve on the supply line just before it exits the house, turn it counterclockwise to open it. This tiny valve releases remaining water from the line. Some newer frost-proof systems have bleeder valves built in. Older standard bibbs rarely have them, which is why they fail. If your line lacks a bleeder valve, listen closely to the outdoor faucet. Water should trickle out for a few seconds, then stop. That means the line is dry.”
},
{
“@type”: “HowToStep”,
“position”: 5,
“name”: “Insulate the Line Inside the Wall”,
“text”: “The most vulnerable section of your outdoor water line is where it passes through the rim joist and exterior wall. This is the coldest point. If your basement or crawl space is accessible, locate this section. Wrap it with self-sticking foam pipe insulation tape, available at any hardware store for under ten dollars. Overlap the tape as you wrap, working from the interior shut-off valve all the way to the exterior wall. The insulation slows heat loss and means the difference between a frozen pipe and a safe one during extreme cold.”
},
{
“@type”: “HowToStep”,
“position”: 6,
“name”: “Install an Outdoor Faucet Cover”,
“text”: “Go back outside. Styrofoam faucet covers slide over the spigot and seal with a strap or adhesive backing. They trap residual heat and block wind from pulling warmth away from the valve. Install your cover snugly over the spigot. Make sure the outdoor handle remains in the open position inside the cover.”
},
{
“@type”: “HowToStep”,
“position”: 7,
“name”: “Check Your Attic”,
“text”: “If the water line for your outdoor faucet runs through an unheated attic instead of an insulated wall, wrap it with heat tape, also called heat cable. This electrical tape warms the pipe and prevents freezing even during extended polar vortex events. Plug the heat tape into a GFCI outlet. It uses minimal power and runs automatically whenever temperatures drop below 40 degrees.”
}
],
“image”: “https://cornerstonewaterdamagerestorationchicago.com/wp-content/uploads/2026/03/the-best-way-to-prevent-outdoor-spigot-bursts-duri-1.jpg”
}
{
“@context”: “https://schema.org”,
“@type”: “BreadcrumbList”,
“itemListElement”: [
{
“@type”: “ListItem”,
“position”: 1,
“name”: “Home”,
“item”: “https://cornerstonewaterdamagerestorationchicago.com”
},
{
“@type”: “ListItem”,
“position”: 2,
“name”: “Blog”,
“item”: “https://cornerstonewaterdamagerestorationchicago.com/blog”
},
{
“@type”: “ListItem”,
“position”: 3,
“name”: “Outdoor Faucet Freeze Protection for Chicago Homeowners in West Elsdon and Nearby Areas”
}
]
}
{
“@context”: “https://schema.org”,
“@type”: “Service”,
“serviceType”: “Water Damage Restoration”,
“provider”: {
“@type”: “LocalBusiness”,
“name”: “Cornerstone Water Damage Restoration Chicago”,
“url”: “https://cornerstonewaterdamagerestorationchicago.com”
},
“areaServed”: {
“@type”: “City”,
“name”: “Chicago”
},
“description”: “Prevent burst outdoor spigots in West Elsdon winters. Step-by-step winterization saves thousands in water damage repair.”
}